Tuesday, August 31, 2010

Emboss Resist

Well, I can't get enough - of all the different amazing techniques that I am encountering as a new crafter, that is. Going back a mere 10 months ago, as I put it to a friend a couple of days ago, I didn't even know I had a creative itch to scratch. My oh my has it opened my eyes to a new and exciting world. I just want to try everything I see... and yet, that's just not going to happen is it?! At least, not as soon as I would like. Humph - no fair!!

One of the techniques however that I have had a particular hankering for is emboss resist. For this technique alone, there are so many variations on how it can be done. The first I saw and have tried is what Jennifer McGuire calls a Layered Emboss Resist. It was so fun to do and I know I have much resistance in my future! You can watch Jennifer's tutorial here:


Just magic! I am entering my attempts into a challenge set by Sarah of Inkurable Stampers, a blog I have only found this week after the purchase of my first Darkroom Door stamp.


The stamps I have used on my card include Darkroom Door Background Stamp French Script and Hero Arts Clings Poppy Background. The inks include yummy Distress Inks Barn Door and Worn Lipstick on the red card and Broken China and Tumbled Glass on the blue version. On the base of both cards I stamped Hero Arts Clings Cling Dots in Stampin' Up! Whisper White pigment ink. I rounded the top right hand corner with the We R Memory Keepers Corner Chomper and then tied a ribbon around the front of each card. For the red card I stamped the French Script onto the white cardstock in Barn Door and then stamped the Poppy Background in Versamark over the top and embossed with clear embossing powder. I then used Worn Lipstick to colour the poppies and Barn Door to add definition and a deeper colour. I then used copic markers to fill in the stems of the poppies. I did the same for the blue card, starting with Tumbled Glass, highlighting with Broken China. I layered these onto blue and pink pearlescent cardstock respectively and pop dotted them onto the card fronts. I stamped Happy Birthday from Hot Off The Press Mix Your Messages stamp set onto the same pearlescent cardstock and cut and embossed them with a Nestabilities Labels 8 die. I pop dotted these also, after attaching a cute dragonfly brad in white.

I went to Paperific on Sunday with a friend. We arrived at opening, obtained our free bag celebrating the 10th Birthday of the expo and took only 20 minutes for lunch, leaving at closing time, only because we had to! It was too much fun! I added to my Distress Ink colours which I am looking forward to playing with and coveted a beautiful die cut machine that does everything! Hmmm....one day....a girl can dream....

May your day be filled with inspiration,


Thursday, August 26, 2010

It's a Boy

Hi there! Here I am posting again; this time I have tried my hand at a different challenge set by Everything But the Kitchen Sink.  This is for Challenge 21 which is being hosted by the gorgeous Kelly Marie Alvarez of Lawn Fawn. If you haven't checked out her blog or stamps and you love cute, then you must take a look - the stamps are seriously adorable and she is so generous! I was lucky enough to win a stamp set from Lawn Fawn last week through Scrap Time which was fantastic. Scrap Time is also well worth taking a look at - Christine shows new products and techniques in videos that are downloadable (is that a real word?) through i-Tunes.

Back to the challenge! The inspiration given by Kelly Marie:


Her front loading washing machine! The sketch:


And my card:


And with matching envelope:


I used DCWV 8"x8" printed cardstock from the Animal Crackers stack to cover the base of the card and to line it up without messing it up I used the simple technique Kelly Marie shows at the beginning of this video:


I stamped the free falling monkey from Hero Arts Clear Design stamp set Playful Animals onto the brown cardstock and again onto cream cardstock and paper pieced the ears and face. The yippee! is from the same set. I then used my Cuttlebug and cut him out using a Spellbinders Nestabilities circle die. The leaves were punched out with  Stampin' Up! Extra Large Two Step Bird Punch and I glued them down and covered them with Dimensional Magic to add some interest and shine.  After pop dotting the circle to the card base I used Lawn Fawn's Bannerific and Sophie's Sentiments on yellow cardstock and pop dotted the banner to complete the card.

That's all from me tonight, time to get some sleep. Thanks for visiting!

May your day be filled with inspiration,


Tuesday, August 24, 2010

I {heart} Die Cuts!

Hello! Funny old day in Melbourne once again  - pouring down buckets this morning, sunshine by school dropoff time and now it's looking a little dismal again! Oh, they do say variety is the spice of life and being kept guessing is kind of interesting...!

Well, I have found a bit of time to craft this week - yay! I've been busy making invitations for parents of a friend who are soon celebrating their Golden Wedding Anniversary. 50 years - an amazing milestone! The invitations I have designed meet the new challenge set by Scrapbook Boutique. This is their second challenge and requires a project to include two or more die cuts that have been self-created; whether the machine be manual or digital it matters not.

As I have said, I've not been card making for long, but after You Tubing many videos I quickly fell in love with the Cuttlebug and it's capabilities and it was my Christmas gift last year. :) It has served me well to date! This card uses Nestabilities Petite Ovals and the Cuttlebug Ornamental Iron  cutting die. It is a gatefold card, scored using a Scor Pal. I have placed gold brads in the centre of the die cuts on either side of the opening of the card and secured a cord to one so that it can be wrapped around the other to hold the card securely closed. A touch of gold on the card to represent the occasion!
The stamp at the base of the card is Hero Arts Slanted Tree which I heat embossed using Versamark and chocolate embossing powder. I rounded the corners at the top with the We R Memory Keepers Corner Chomper.


I love a matching envelope, so I stamped on two corners of the envelope with the Slanted Tree stamp.

Oh - and did anyone notice I said I {heart} die cuts???!

Why don't you join in the fun and enter your own creation for this challenge? The prize is a $25 Scrapbook Boutique Gift Voucher and is open to Australian residents only.


May your day be filled with inspiration,


Saturday, August 14, 2010

Asian Influence

Hi there! I hope this post finds you well and finding more time to craft than I do! Sometimes it's a little difficult to stamp and/or cut with a gorgeous 3yo who wants to do everything you are doing with those oh-so-sharp - *divine* - Tim Holtz scissors! I'm thinking I'll need to have some late night sessions to get the few birthday cards that need doing by the end of this month. I'm sure many can relate to everything I'm saying here!

The card I am posting today is being entered into the CPS Sketch challenge179 which looks like this:


My take on this sketch :


The patterned paper I have used is from two different sheets by Australian designer Alison Ellis - Eastern Elements - Wind Medley and Eastern Elements - Earth Block. This range is beautiful. 

I have used a Martha Stewart punch combo Deco Fan (shell) - one punch cuts the corner and the other punches the edges. I haven't seen these locally, so I purchased this online from Scrapbook Boutique

I hand made the flower and the organdie ribbon and cardstock are from my stash. 

The cute Happy Birthday stamp is from The {Stamps} of Life set, banners4all and I used Versamark ink with Alison Ellis Design gold sparkle embossing powder.

To round the corners I used the We R Memory Keepers Corner Chomper.

My twins play in a football semi final tomorrow, so I better get some sleep - plenty of cheering to be done early in the day!


May your day be filled with inspiration,


Sunday, August 8, 2010

Happy Accidents

Hi there! I have really only become familiar with blogs this year after taking up card making in the latter part of last year. I have been enjoying the creations I have viewed and am often in awe of what talent exists! I am learning that unless you have an amazing natural gift, it is practise along with trial and error through which betterment comes. Oh - and perhaps some occasional frustration when things don't turn out perfectly! On that note, I think the best advice I have read is 'there is never a mistake in card making'. So happy accidents will be my thing!

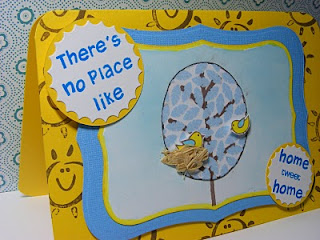
Having said that, please excuse the little smudges and the not-so perfect embossing on this card! I made 'Home Tweet Home' for a friend and her husband and their two little ones after her hubby's three months working interstate. I was eager to use these newly released stamps and am very happy with them. I have also entered this card into the first ever challenge held by Scrapbook Boutique. A first for me too! The challenge involves a card to be made with the colours blue and yellow. I have used copic markers to colour the birds, distress ink for the background, patterned paper for the leaves and I stamped on the base of the card. I love my nesties and don't think I will ever have as many as I want!


2010 has not been a kind year to me and my family, for reasons I will not go into right now, but discovering the joys of creating something to give to others is giving me therapeutic benefits of a sort. Without it, I would not have something to focus on to help me through these trying times. I have much to learn - about card making, blogging and life, so bear with me as I muddle on through! I'd love to hear from you! :)

May your day be filled with inspiration,


Trexxie
09 10 11 12
Blogging tips