I want to apologise for not sharing my April projects with you until now. The month was a difficult one for my family as my beautiful mother-in-law sadly passed away, suddenly, and it was not possible to find the time, inclination or energy to craft.
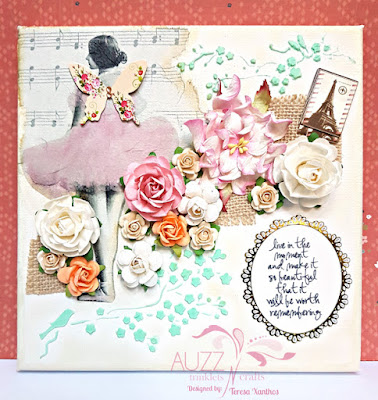
The project I am sharing today is very different from my usual creations. I found myself looking through the Auzz Trinklets and Crafts store for products that hit me with their shabby chic-ness.
I took a 20cm x 20cm canvas and covered it with Ranger/Dina Wakley Media Gesso in white and allowed it to dry. I have not tried napkin art before, but was keen to give it a go and found the perfect napkin for a shabby chic project - a parisian themed ballerina displayed with a music manuscript - perfect! I separated the layers of the napkin and kept only the top sheet with the image to use on the canvas. I tore away the section of the napkin that I wished to use and carefully cut around the ballerina's legs. I used a PVA glue to adhere the napkin, brushing the glue directly onto the canvas and on top of the image. I would thoroughly recommend using a decoupage glue, as it designed specifically for this and I plan to use this in the future. The PVA seemed not quite right for such a delicate paper. Again, I allowed this to dry before continuing with my project.
I love The Crafter's Workshop stencil Mini Cherry Blossoms and I paired this with Ranger Texture Paste, coloured with a few drops of Ranger Distress Ink in Cracked Pistachio. I placed the stencil in the bottom left corner of the canvas and applied the coloured texture paste to bottom half of the stencil. I removed the stencil, cleaned it off with a baby wipe and then moved it to the top right of the canvas and applied more texture paste to the area. Although the stencil is smaller than the canvas, once the middle of the canvas is covered with other items, it gives the illusion that the stencilled image is continuous. This also was given time to dry. (Yes, I needed to be very patient creating this canvas!)
I cut up some small pieces of Burlap Fringe in Sand and adhered these to the canvas with my favourite adhesive, Ranger Multi Medium Matte. My favourite, as it dries clear and leaves no evidence of its presence; no shine, so it doesn't matter if it happens to ooze out from the sides of the object you are adhering.
I then arranged paper flowers onto the canvas that have been in my stash for a considerable length of time, so this was a great opportunity to use them. You can find a beautiful range of flowers in the Auzz Trinklets and Crafts store here.
The butterfly wings and Eiffel Tower embellishments were from my stash, as was the frame sticker around the lovely sentiment which comes from the Stampers Anonymous/Tim Holtz stamp set, Urban Chic.
To complete the canvas, I took a sponge finger dauber and applied Tsukineko Golden Glitz ink to the entire canvas, apart from the inside of the framed sentiment.
Thankyou for following along with me today. Please feel free to ask questions if anything needs clarifying. If you cannot find the items I have used (listed below) in the Auzz Trinklets and Crafts store, be sure to drop Neha a message via email or Facebook and she will do what she can to order the product in for you.
Happy crafting and have a great day!
Products used:
Canvas 20cm x 20 cm
Ranger Ink/Dina Wakley Media Gesso (white)
Napkin - Ballet Paris
PVA glue
Sospeso Transparente - Decoupage Glue (recommended)
The Crafter's Workshop stencil - Mini Cherry Blossoms
Ranger Ink Texture Paste
Ranger Ink Distress Ink - Cracked Pistachio
Burlap Fringe - Sand
Ranger Ink Multi Medium Matte
Paper Flowers
Embellishments - butterfly wings, Eiffel Tower, frame sticker
Stampers Anonymous/Tim Holtz stamp set - Urban Chic
Tsukineko Sponge Finger Dauber
Tsukineko Golden Glitz ink pad


No comments:
Post a Comment
Thankyou for leaving a comment - you've just brightened my day! :)